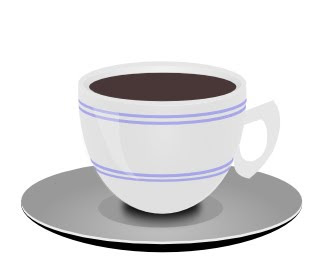
Before we get started to create, lets take look at the end result of vector images that we will make is like below, you can download the source of inkscape file http://www.box.net/shared/ykashteasn, to make it easily in just a few steps, the steps to create an image of a cup of coffee is good as well refer to the following :
Step 1. Open Inkscape stable 047 version, then create a new document as the default size.
Step 2. Make a circle like the image below, its function as a coffee cup base that we will create. made in accordance with the first image and further explanation will be described later.
Now we need to change the fill and stroke (outline) colors, so select your ellipse and open up the Fill and Stroke dialog window by going to Object > Fill and Stroke (Ctrl + Shift + F). On the Stroke paint tab click the "X" button to eliminate the outline on this shape.
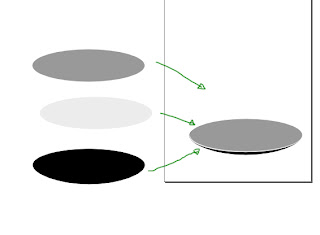
Step 3. Create an elliptical 3 fruits with different colors, then stacking these 3 fit ellipse in the figure to almost form a base of a cup of coffee.
Step 4. next make a gradient as shown below by using the gradient tool. made to look realistic images using 2 colors of different gray.
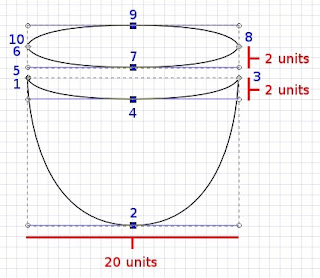
Step 5. We'll begin by drawing two shapes with the Bezier Curves tool (Shift + F6). Make one for the face of the coffee cup and one to form the outer rim of the cup. These shapes need to match up in width and the amount of curve. I recommend that you turn on the grid to help you draw these lines (Shift + #). Also note, Click to create a point, click and drag to create a curve.
I actually drew these shapes in place on top of each other, but I separated them in this screenshot to show how I drew the shapes and their curves. Notice that both shapes and their curve lengths are 20 units wide. Also, notice how the bottom of the rim matches the top of the cup face; They are both 2 units deep. For guidance, the numbers in blue show the order in which I created the points/curves.
I actually drew these shapes in place on top of each other, but I separated them in this screenshot to show how I drew the shapes and their curves. Notice that both shapes and their curve lengths are 20 units wide. Also, notice how the bottom of the rim matches the top of the cup face; They are both 2 units deep. For guidance, the numbers in blue show the order in which I created the points/curves.
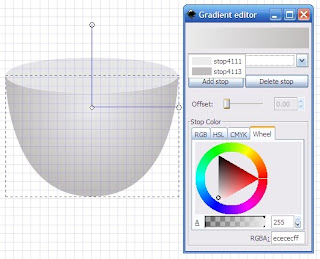
Step 6. With the grid still on, place the rim directly on top of the cup face. Eliminate the stroke from both shapes. Fill the rim shape (that looks like an ellipse) with a solid color gray (e6e6e6ff). Fill the cup face with a radial gradient that goes from ecececff at the center to bdbdbdff. Then place the center of the gradient near the top of the cup shape, as shown below.
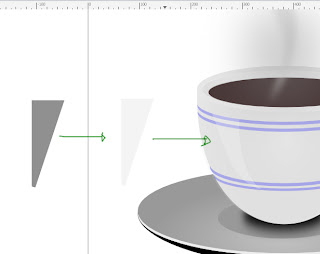
Step 7. Duplicate the rim shape and scale it in a little bit to form the width of the rim. Give this shape a thin gray stroke (d6d6d6ff) and a radial gradient from ecececff to bdbdbdff. Then drag the gradient handles to match the picture below.
Step 8. then make the 3 components according Screenshoot appear on the bottom, then collated to form into a cup shape.
Step 9 So here's the method I came up with that worked quite well. Create an ellipse with about the same proportions as the coffee cup rim. Then fill it with any color (no stroke). Now duplicate that ellipse, place it below the first one, and pull the bottom drag handle down a little bit. Then push the sides in some too. I colored my ellipses two different colors so you can see how this should look.
Step 10. Select both ellipses and choose Path > Difference (Ctrl + Minus Sign) from the menu. Presto! You now have a beautiful vanishing curve. Fill your new shape with whatever color you prefer. Duplicate it as many times as you want. Then place it on top of your coffee cup wherever you choose.
Step 11. Now let's create a wispy trail of steam. Create a shape with the Bezier tool like the one below. Color it a light brown or gold color, make it semi-transparent and blur it also. Play around with the Master Opacity and Blur settings until it looks just right.
Our coffee cup is finished! As with the saucer, you may find it handy to group all the shapes that comprise the cup.
Our coffee cup is finished! As with the saucer, you may find it handy to group all the shapes that comprise the cup.
Step 12.
Final Image







{ 2 comments... read them below or add one }
Inkscape 0.47 Stable Version = design graphic program like Corel Draw? Nice Posting.
mantap desain 3dnya
Post a Comment